Classic Salmon and Trout Flies
of Europe and the Americas |
 |
A Path to
Full Dress Salmon Flies
If you've thought about jumping into the full dress salmon fly arena, please do. Anyone
with good fundamental tying skills and great perseverance can tie these flies.
They're beautiful, difficult, and rewarding when you at last pull them off. So
jump in if you feel inclined but don't do it with both feet. Learning these
flies is a process, and you should learn to walk before you run.
I strongly suggest to students that they first master simple wet fly wings before attempting
the larger and more difficult married wings. It used to be that tiers learned
to mount these wings as a matter of course, but these days, with the old wet
flies less popular than they once were, this part of a tier's education may be
missing. It is essential that you master wet fly wings if you want to take the
most frustrating element of full dress flies out of the equation.
I've chosen
the Leadwing Coachman to get you going for a couple of reasons. First, it's a
fly that fishes great to this day, especially in the East. Second, it's a fly
that can be tied quickly and inexpensively, allowing you to really focus on the
winging.
I'd like you
to do this fly in a very particular way, and I'll elucidate as we get going.
Step 1. Start with a wet fly hook in a large size, 6-10.
Leave a space behind the eye and wrap thread to the bend. Tie in a piece of
gold tinsel on the far side of the hook with five wraps of thread, gold side
against the shank if you're using Mylar.

Step 2. Wrap the tinsel down the bend five wraps, and then
four back up toward the eye, over the previous wraps. Now unwrap the thread
four wraps and catch the tinsel under the hook, binding it down with three
thread wraps forward. Always count thread wraps and keep track of them if you want
to get good results on the big flies later.

Step 3. Cut the butts and wrap almost all the way to the
front but not quite, then back to the tag.
This will facilitate a taper at the front of the fly, which will help
with the mounting of the wing.

Step 4. Tie in a piece of peacock herl so that when you wrap
it, the heavy stem will face forward. This will give us a dense body.

Step 5. Wrap the herl forward, stroking the fibers back as if
you are tying in a wet fly hackle. We could have used three strands of herl and
twisted them around the thread as we wrapped, but that makes for a bulkier
body. A bulky body will kick the wing up, something we don't want in this
exercise. Don't leave too much room for the hackle. We want to crowd the eye,
promoting a small head.

Step 6. Tie in a wet fly hackle as shown, two wraps in front
of the herl. Bind down all the way to the eye. Trim off the tip.

Step 7. Wrap the hackle all the way to the eye, about four
wraps or so. Stroke the fibers back as you wind, folding the hackle. When you
reach the eye, catch the hackle with a thread wrap and fold the butt end of the
hackle forward with the left hand to get its fibers out of the way. Bind down
with three wraps and cut off the hackle stem.

Step 8. The resulting hackle should look like this.

Step 9. Now pull the hackle down into a beard with the left
hand and bind it down with flattened thread. This provides a smooth surface on
which to mount the wing. Throats on many salmon flies are bound down like this.

Step 10. Cut slips from left and right mallard quills. The
left quill will have the longest strands on the left side of the feather when
viewed upright from the front, and the slip cut from it will make up the far
wing when mounted. This is opposite of the feathers that you'll use later for
full dress flies. Mallard quills have a lot of reverse curvature, that's why.
The feathers used for full dress flies have simple curves across their
surfaces, while mallard and duck quills have compound curves. Try to take slips
from the middle third of the feathers. They should be at least 2/3 of the hook
gap wide. Less slip width fishes better, more width is closer to full dress
salmon fly width.

Step 11. Hold the slips so that the long sides are on top,
tips up and together, concave sides together. Wet fly wings can be mounted
other ways, but this way best emulates the mounting of wings on full dress
flies. The tips should not extend much beyond the end of the hook, if at all.

Step 12. Pinch the feathers together, barely straddling the
top of the hook, using the thumb and middle finger of the left hand. Make sure
you are in contact with the shank of the hook. Keep your left elbow down in an
effort to mount the wings level. We're trying to get these parallel to the
shank, though they will almost always kick up a little. Take a soft pinch loop
around the slips, and then pull the bobbin straight up with the right hand. I
also hold the butts in place with the right as I do this. You will use all of
your fingers for this and then some. Then do a second soft loop and pull down.
Fight thread torque with your left index finger. Endeavor to keep the slips
vertical, dead on top of the shank.

Step 13. Here's the wing with two loops holding it. Now
adjust and tweak as necessary.

Step 14. After verifying that the wing is vertical by looking
down on the top of it and comparing with the keel of the hook, take a couple
more securing wraps (always holding slips with the left hand), and then cut off
at an angle.

Step 15. Here is what it should look like after butts are
bound down with the thread. To accomplish this, work the thread down to the
eye, then wind close touching turns back up to the wing, always holding slips
in place with the left hand. These turns should be taken with a lot of thread
tension.

Step 16. Make sure when all is said and done that the wing
looks good from the top.

Step 17. Always check the other side of the fly as well.

Step 18. Now whip finish with flattened thread from the wing
all the way down to the eye, again holding the wings with the left.

Step 19. Finish with lots of head cement, as penetrating a
type as you can find. When you can set these wings every time out comfortably,
you're ready to tackle full dress flies. Here are some other wet flies you
might want to try if you get bored with the Leadwing
Coachman:

Yellow Sally: Great for working on your floss technique and
ribbing spacing.
Tag: Flat gold tinsel. Tail: Yellow duck quill. Ribbing: Flat
gold tinsel. Body: Yellow Floss. Hackle: Yellow. Wing: Yellow duck quill

Royal Coachman: It still fishes well to this day.
Tail: Golden pheasant tippet. Butt: Peacock herl. Abdomen:
Red floss. Thorax: Peacock herl.
Hackle: Brown. Wing: White duck quill.

Dr. Burke: The jungle cock cheeks transfer to many salmon
flies.
Tail: Peacock sword. Ribbing: Oval
silver tinsel. Body: Flat silver tinsel. Hackle: Yellow. Wing: White duck
quill. Cheeks: Jungle cock eye.

Cassard:
An introduction to married wings and tails. Use goose secondaries to
wing this, not duck quills, as they will match up well with the barred wood
duck. Use the lefts for the near wing, rights for the far wing, just as you
would on a salmon fly. Lefts will marry only to lefts, rights only to rights.
Tag: Gold tinsel. Tail: Married yellow, red, insect green
goose secondaries and barred wood duck. Ribbing: Flat gold tinsel. Hackle:
Yellow palmered behind ribbing. Body: Red floss.
Wing: Married yellow, red, insect green goose secondaries and barred wood duck.

Married Wings
Marrying wings is the easiest thing in the world. If you take
a slip from a left turkey feather and a slip from a left bustard feather and
apply them together edge to edge starting at the tips, they will marry. It's
nature's way of keeping the fibers of any bird's wings in order. Just “zip”
them together with a stroking motion.
Here is a shot of a left turkey slip married to two slips
from a left Amherst pheasant tail:

With full
dress salmon flies you can mix and match the winging materials anyway you want.
You are limited only by the length, curvature of the face of the feathers you
are using, and your imagination. You must use high quality slips however, no
crossed or short strands in the slip. Keep in mind that some materials marry
more easily than others. Bustard, turkey, goose, Amherst pheasant, Macaw, all
marry well. Golden pheasant tail won't marry as securely, nor does peacock wing
marry easily. The only other thing you need to remember is, lefts marry to
lefts, and rights to rights. A slip cut from the left side of a stem will never
marry to one cut from the right side of a stem.
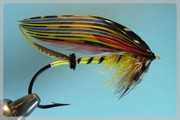
Now for the
Real Thing
Please don't start with a Popham, Jock Scott, or even a Silver Doctor. A Silver Doctor has
and underwing of golden pheasant tippet, with golden pheasant tail slips tented
over that, then the main wing tented over that, and finally, bronze mallard
tented over that. It's a difficult fly even for an experienced tier. I've found
a fly here from Francis Francis' work from the mid-1800s A Book on Angling. A great fly dresser named “Snowie” was the
originator. It's Snowie's #2 for the
Brora, a river in Scotland. It has none of the things that may trip you up
in the beginning, no tail veiling, no palmered body hackle, no seal dubbing,
and no mallard roof. You can tackle all these in time, but with this fly you
can just worry about getting a good floss body, mounting a golden pheasant
tippet underwing, and then pulling off a married wing over that. These things
should keep you busy for a while. Here is the recipe from Francis Francis:
Tag, silver tinsel and orange floss; tail, a topping; butt,
black ostrich; body, half orange floss and half black mohair; hackle, gallina
only at shoulder; underwing, a bit of tippet (longish), wing (sic),
orange-yellow and claret strips of swan, gold pheasant tail, mallard, pintail,
a topping over all, short jungle-cock on either cheek; blue macaw ribs; black
head.
“Ribs here refers to what we now call ‘”Horns”, “topping” to
golden pheasant crest, “gallina” to guinea feathers, and “tippet” to golden
pheasant tippet.
Step 1. If you're using a blind eye hook, tie in a piece of 2
or 3-strand gut as shown. I've used a 2/0 Partridge blind eye hook CS10/3 for
this fly, as it's readily available on-line. There is an eyed version CS10/1 that
will work just fine for this fly as well. These are inexpensive and will get
you going.

Step 2. Tie the other end of the gut off on the other side of
the hook creating a loop, and trim. Then use your scissors to round out the
eye. The point of the hook should protrude halfway into the resulting circle.

Step 3. Create a thread underbody with wide white thread.
Wrap it over itself back and forth to create a taper, and then take the thread
to a position bisecting the barb of the hook as shown. Strip the metal off the
end of a piece of fine oval silver tinsel. Tie it in on the far side of the
hook, catching just a couple of turns of the metal.

Step 4.Wrap forward five wraps, binding down the core.

Step 5. Wrap the tinsel forward four or five wraps, and then
unwind the thread back to the tinsel. Catch the tinsel with one wrap under the
hook and bind it down under the hook with four more wraps forward.

Step 6. Continue to wind forward until the thread is hanging
down just barely behind the point of the hook. Tie in a piece of orange floss
on the far side of the hook and bind down underneath with eight wraps forward.

Step 7. Wrap the floss back to the tinsel, then forward again
to the tie in point. Back off seven turns with the thread, catch the butts of
the floss and wrap thread four turns forward. This will form a base for the
tail and butt.

Step 8. Select a golden pheasant crest that is 1 ½ times the
hook gap when measured diagonally from tie in point to the tip of the tail.
This is a rule of thumb that Ron Alcott came up with years ago and it's a good
one. Make sure the tail is straight, and if it isn't, soak and let dry around a
small pill bottle to straighten. Strip the fluff off the end and crimp the stem
in such a way with thumb and middle finger that it will lie back when the stem
is tied in. Flatten the stem with pliers or tweezers. Tie in just the stem with
two wraps only.

Step 9. Make sure the stem is centered. Pull the stem forward
just enough to gather the outermost fibers together. Just a little bit of the
crest fibers should show in front of the tie-in wraps. Don't overdo this. If
you pull to far things will get worse. You just want to get enough of the
fibers to stabilize and straighten the tail. Make sure the tail is vertical by
looking directly down on it and relating it to the keel of the hook, as well as
the shank.

Step 10. Tie in a
small diameter piece of black ostrich herl underneath the hook at the tail.
Make sure that the bottom of the feather faces you (concave side). That way
when you wind, the stem will face forward and the flues will angle back.

Step 11. Wind 4 or 5 wraps of ostrich herl to form a dense
butt and tie off on the bottom of the hook. Take the thread to the 50% area of
the shank and tie in a long piece of orange floss on the far side of the hook
and bind underneath with 8 wraps. Floss is slippery and the extra wraps are
necessary if you've used GSP thread as I have here. Ive
used one strand of Danville four strand rayon floss. Silk is fine as well but
if you use Lagartun use just one of the three
strands.

Step 12. Wrap the floss carefully, edge to edge, back to the
butt and forward again to the tie in point. Tie off with three wraps forward
and then trim the butts. Wrap the thread forward to just short of the starting
point of the white thread, then back to the beginning of the orange floss. Some
tiers use silk gloves to wind floss, as they help retain the luster of the
floss, which can be dulled by the oils in your fingers.

Step 13. At this point I decided to switch to black thread (Lagartun 95 denier). I ran it from just where the white
started back to the orange floss, wrapping over the white thread and trimming
it off. This formed a dark underbody for the black mohair.

Step 14. Dub the mohair on heavily waxed thread just as you
would dub seal. Don't use a dubbing loop, just lots of wax and pressure. Make
sure this section of the body tapers down to well short of the eye, as shown.
This will help with the mounting of the wing.

Step 15. Tie in two golden pheasant tippets back to back.
Notice that I've tied them in well short of the eye, and have crimped a bend in
the stems to get over the hump of mohair. I want this wing to lay flat and
level, not cock upward.

Step 16. Here is detail on the mounting of the underwings. I
have flattened both stems, crimped a compound bend with tweezers, and then
mounted the wings with only four or five wraps of well waxed thread. I will cut
off the part of the stems showing, but only after I've used them to manipulate
the underwing to a perfect position. I
don't want stems underneath the head area. I'm trying to keep the bulk down up
front.

Step 17. Make sure your underwing looks just like this from
the top, perfectly vertical. This is critical to the mounting of the main wing.
If this isn't right you're doomed. The underwing must be perfect.

Step 18. Now tie in a guinea hackle as shown. Tie it in two
wraps in front of the underwing, not right at it. That way the underwing won't
be affected when you wind the hackle. Bind down the tip all the way to the eye
so it won't pull out when you wrap. Cut off the hackle tips.

Step 19. Wrap the hackle all the way to the eye, then pull it
down into a beard and bind down with flattened thread.

Step 20. If you have some thick stem showing, cut it with a
razor blade and remove it. This is just slightly more delicate than heart
surgery, but that stem will cause no end of heartache when you go to mount the
wing if you leave it there.

Step 21. Now the moment has come to mount the married wing. I
like to hold the slips between thumb and middle finger with my left elbow down,
but you can try thumb and index finger as well, either way can work. I start
with the wings completely level, i.e. parallel to the hook shank. Tips should
be just short of the tip of the tail. Spend a lot of time verifying everything;
that I'm just straddling the top of the hook, and that the far wing hasn't
slipped down. If you're not holding the wing just right, there will be trouble.

Step 22. Take a soft pinch loop around the wings with unwaxed thread, and make sure your left hand has contact
with the shank.

Step 23. Begin to slowly crush the feathers. I do this by
holding the butts with my right hand while also raising the bobbin up. Marvin
Nolte takes a second pinch loop and pulls straight down. However you do this,
crush the fibers slowly and in stages, fighting thread torque as you go. I
could write volumes about mounting a wing but it's something that only practice
will make perfect.

Step 24. Once you get the fibers crushed most of the way, do
another pinch loop, crush them the rest of the way, and then adjust everything
forcefully. Wrench the fibers into place, manhandle them. If some fibers in the
wing have split, remarry them. It will typically look bad at first, but it will
get better, don't panic. You can remount a wing multiple times if necessary,
steaming the feathers in between. Sometimes the tenth time is a charm.

Step 25. When you're happy, bind down with several more wraps
of heavily waxed thread, all the while holding the wing in place with the left
hand. Don't let go or your perfect wing will move.

Step 26. Thoroughly check things.

Step 27. Check the top.

Step 28. Check the far side.

Step 29 If you're happy, cut the butts and bind down, all the
while holding your perfect wing in place. Don't ever let go of the wing when
you are wrapping from here on.

Step 30. Marry the teal and grey mallard slips (taken from
the left sides) together to form the near “sides”. Mount them low with one
wrap. I subbed pintail for grey mallard because Kelson
gave me permission to do just that in his epic work The Salmon Fly. I've always wondered how to handle grey mallard,
which is hardly ever used in the old flies, and he says that nobody ever really
used grey mallard, they used pintail or widgeon instead. So that's what I've
done. Francis Francis does not specify “brown
mallard” here, as he does in other recipes, so I have assumed grey. If brown, I
would have made a mallard roof of it.

Step 31. Do the same with “rights” to form the far sides.

Step 32. Prep a jungle cock eye by cutting the fibers on the
stem close. Don't strip them. This makes for secure mounting.

Step 33. Add a jungle cock eye to the near side. Find one
that will curve down when mounted, if you can.

Step 34. Do the same with the far side. Trim its stem fibers
the same way you did the near jungle cock eye.

Step 35. Mount a golden pheasant crest feather topping. Tie
in with three wraps and use the flattened stem to adjust it. There is a lot of
manipulation of the crest needed to make it fit and lay the way you'd like. You
can crimp the stem in the first third of the feather to adjust it for more or
less curvature. Use your thumbnail against the pad of your middle finger.
Topping manipulation can't be covered in its entirety here, but don't be afraid
to play around and try some things.

Step 36. When you get the topping where you'd like it, cut
off the stem and bind the remaining stub down. If you try to bind down the
whole stem, the topping will kick up.

Step 37. All is bound down, and all is still intact. This can
be difficult to achieve. Try not to touch anything as you apply materials. This
is easier said than done.

Step 38. Apply blue and yellow macaw horns, a left for the
near side and a right for the far side. There is a trick. You want to tie in
the horns so that the yellow shows on your side, with just a line of blue on
top. Then they'll curve correctly.

Step 39. Apply head cement liberally, to fill gaps, at least
two coats. Throw on some Sally Hanson's or other lacquer of your choice and
you're done!

There are
some other flies that are good starter flies. You don't need to complicate the
wings as much as I have on some of these.
Keep it simple in the beginning, take breaks between stages to keep the
stress down, and above all, have fun with these fantastic flies!
The
Druggist
Tag: Silver Tinsel, Yellow floss. Tail: Golden pheasant
crest. Butt: Black ostrich herl. Ribs: Silver tinsel. Hackle: Yellow from the
second turn of ribbing. Body: Black Floss. Throat: Jay sub. Wings: Tippet in
center, yellow, red and blue swan, bustard, peacock wing, golden pheasant tail.
Topping: Golden pheasant crest. Cheeks: Jungle Cock.

Kelson's Green
Highlander
Recipe from Kelson's book The Salmon Fly:
Tag: Silver twist and canary silk. Tail: A topping and teal.
Butt: Black herl. Body. Two turns of yellow silk and green seal's fur. Ribs:
Silver tinsel. Hackle: Green from yellow silk. Throat: A yellow hackle. Wings:
Two tippets (back to back) veiled with light and dark Bustard, Golden Pheasant
tail, dark mottled Turkey, Swan dyed green, Mallard, and a topping. Horns: Blue
Macaw

Tom Tickler
Recipe from John James Hardy's Salmon Fishing:
Tag: Silver tinsel and blue floss. Tail: a topping. Butt:
Black ostrich herl. Body: Orange floss. Ribs: Gold tinsel. Hackle: Orange.
Throat: Blue hackle and guinea fowl. Wings:
Golden pheasant tail, red swan, bustard. Head: Black.
Note: The hackle doesn't have to be palmered,
though that is typical. See the second version of the fly.


Red Rover
Recipe from Kelson's The Salmon Fly:
Tag: Silver twist and yellow silk. Tail: A topping. Butt:
Black ostrich herl. Body: Magenta Berlin wool. Ribs: Oval silver tinsel.
Throat: A red hackle. Wings: Tippet, peacock wing, bustard, swan dyed red,
golden pheasant tail, and a topping. Sides: Jungle cock. Head: Black
Note: There is a modern version of this fly that has a red
body, from Veniard. I went with red. It is the Red
Rover after all.

Hardy's
Forsyth
Recipe from John James Hardy's Salmon Fishing:
Tag: Silver tinsel and yellow floss. Tail: a topping. Butt:
Black ostrich herl. Body: Yellow seal fur. Ribs: Gold tinsel. Hackle: Yellow.
Throat: Jay sub. Wings: Yellow and red swan, 2 toppings. Horns: Blue and yellow
macaw. Head: Black.

Background image from "Trout" by Bergman (1938)